Cherry Cabinet Refinishing in Fort Collins: Color Change to Deep Slate With a Two-Tone Interior That Paint Cannot Replicate
The brief on this project was tonal. Take a well-built solid cherry cabinet with four glazed doors and an applied crown molding cap, strip the natural honey finish, and bring it back in a deep slate that reads close to black in ambient light and reveals a cool blue-gray cast under direct daylight. Keep the interior in natural cherry. Put it back together correctly.
Simple to describe. Demanding to execute well.
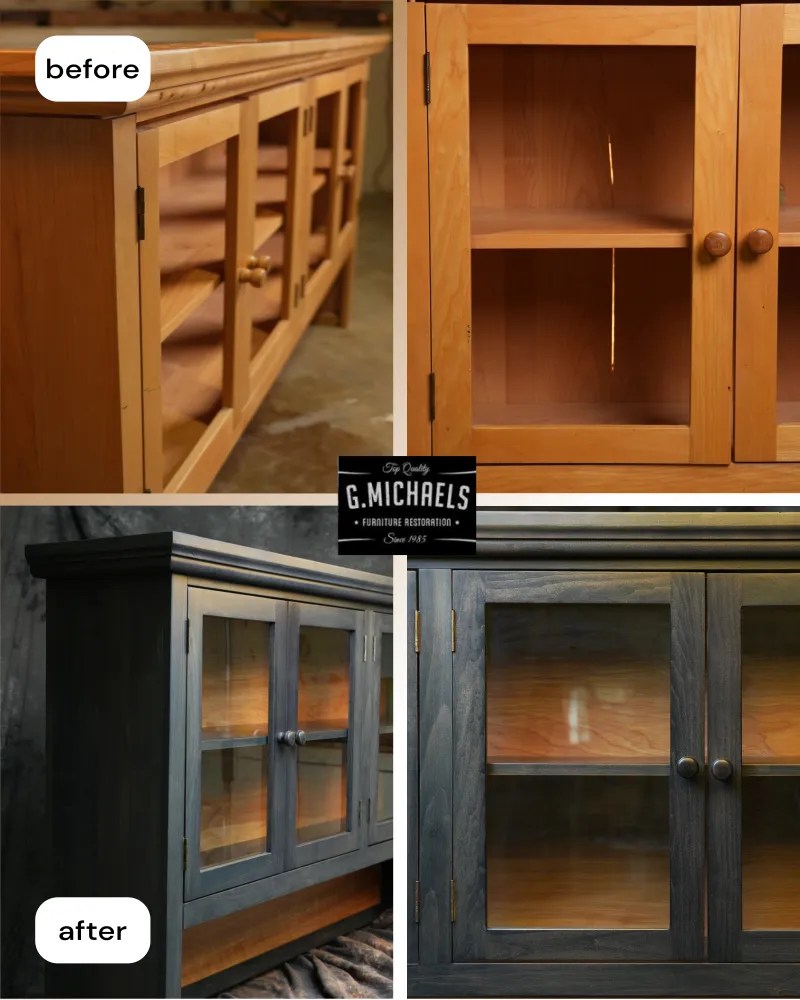
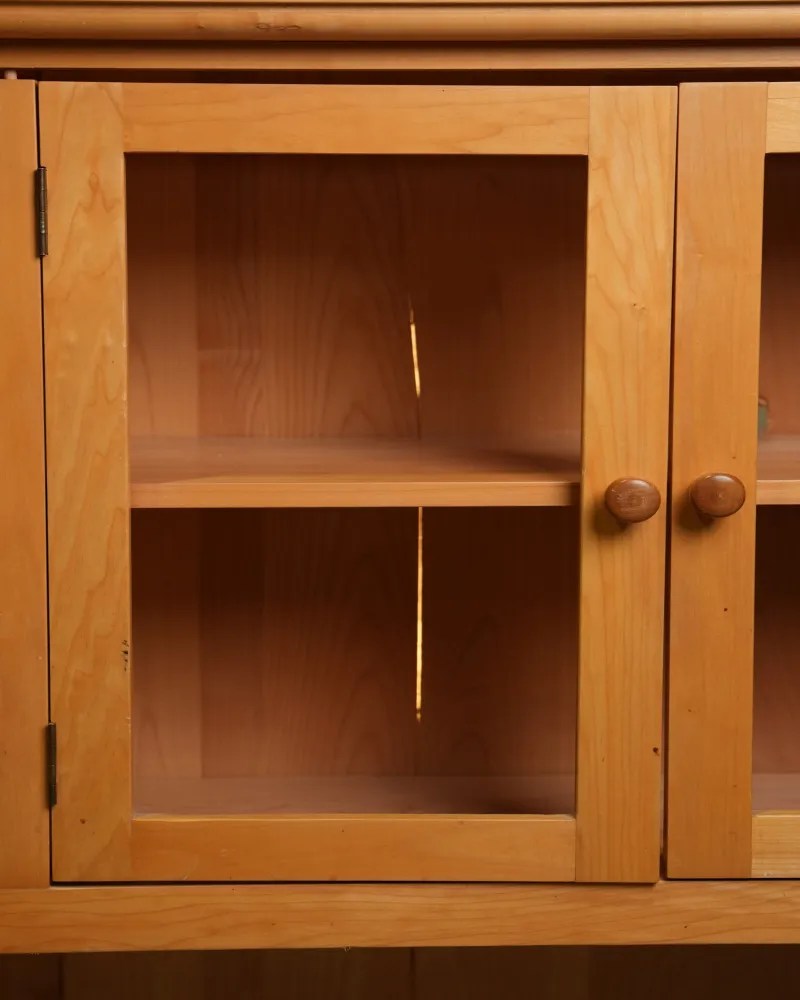
The before photographs show exactly what came in: a structurally sound, clean-lined cherry case piece in its original light finish, four glazed doors with original brass hardware, crown molding across the full top, and an interior with cherry grain visible through the glazing that was worth preserving. The joinery was tight, door alignment was correct, and the case was square throughout. No structural work was needed. The project was entirely about the finish, which meant the margin for visible error was close to zero.
.
Project Overview
This project covered the complete exterior of the cabinet with a deliberate two-tone specification:
- All four glazed doors fully dismantled: glass removed, hinges, knobs, and catches detached before any surface work began
- Exterior surfaces stripped to bare wood throughout: case sides, top, door frames, and crown molding profile
- Deep slate finish developed in stages and applied by hand across all exterior surfaces
- Color built with particular control at the crown molding profile and door frame junctions, where end grain and face grain absorb differently
- Cabinet interior deliberately retained in natural cherry finish throughout
- Brass glass retainers and original-style hinge hardware reinstalled after full cure
- Glazing reset last, after all finish work was complete and confirmed
Why the Glass Had to Come Out First
On a glazed cabinet, the sequence of operations is not optional. Every step follows from the one before it, and getting the sequence wrong produces results that are visible to anyone who looks at the finished piece from close range.
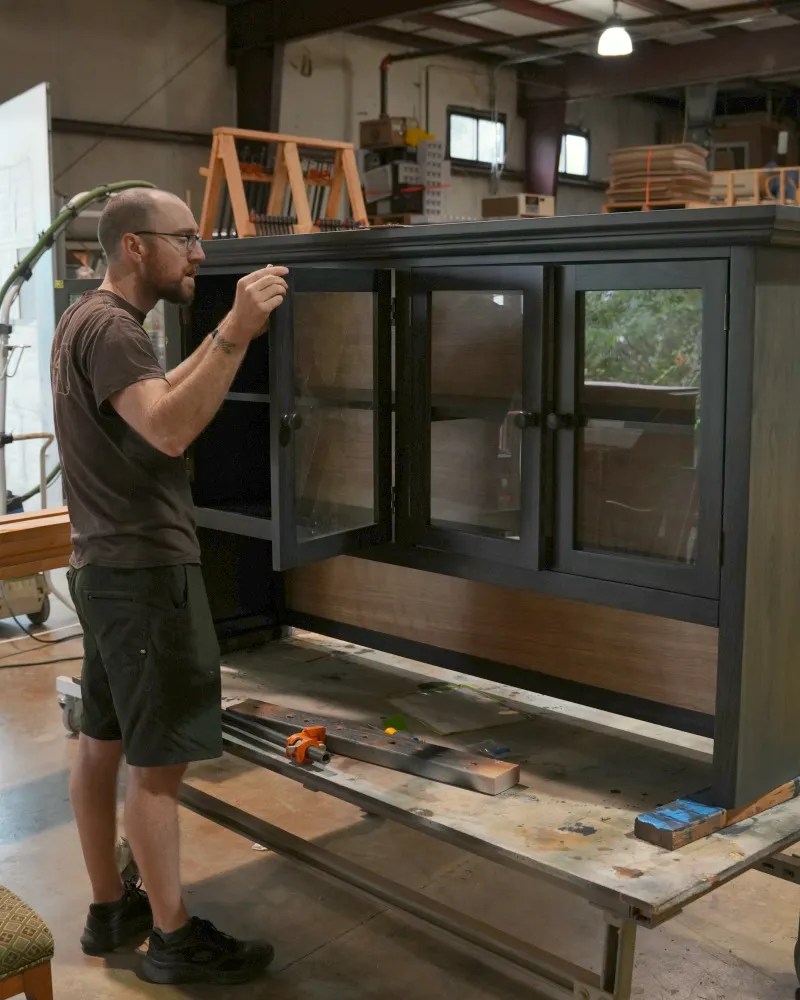
The glass panels in all four doors were removed before any surface work began, along with the hinges, knobs, and catches. This is not a preference or a convenience. It is the correct approach, and the reason is specific.
Masking around a fixed glass pane to protect it during surface work produces a visible finish ridge at the muntin edge once the masking is removed. The finish builds up against the tape line and leaves a raised edge that catches light and reads immediately at close range. Masking also traps residue in the rabbet where the glass seats, which creates adhesion problems for the glass retainers when they are reinstalled and produces a finish line in the rabbet that is visible through the glass when the door is closed.
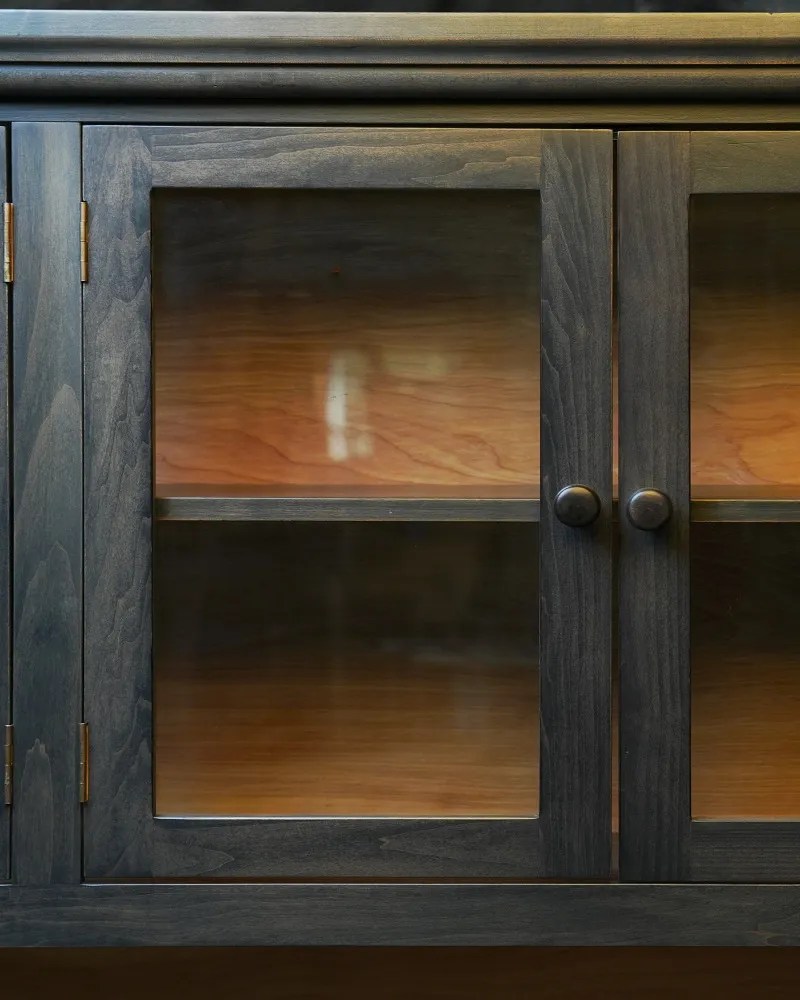
Removing the glass entirely eliminates all of those problems. The muntin and door frame can be finished correctly all the way into the rabbet, the finish can be applied without masking constraints, and the glass goes back in cleanly against a fully cured, properly finished surface. The brass retainers visible in the detail photograph sit correctly against the finished wood without any ridge or residue from masking tape underneath them. That is what proper sequencing looks like in practice.
Our approach to cabinet repair and restoration on glazed pieces always follows this sequence. The extra time it takes to dismantle and reassemble correctly is the time that produces a finished piece without visible shortcuts.
The Color: Deep Slate and What It Actually Does to Cherry
The color specified for this cabinet was a deep slate: a dark value that sits close to black in normal ambient light and reveals a distinctly cool blue-gray cast when the piece is viewed under direct daylight or directional light. Looking at the finished photographs in the images, the exterior reads as near-black from across a room and shows the cool undertone clearly at close range, particularly on the flat case sides where the light hits evenly.
This is not a standard dark stain applied to cherry. Getting a true slate on cherry, with the cool blue-gray undertone reading correctly rather than going brown or purple, requires developing the color in stages and evaluating it under multiple light conditions throughout the process. Cherry has a warm natural undertone that will pull a dark finish toward brown if the color development is not controlled carefully. The slate specification requires working against that natural tendency at each stage, building the cool components of the color progressively rather than applying a single dark coat and hoping the result reads correctly.
The crown molding profile on this cabinet presented the most technically demanding part of the color development. Molding profiles contain inside curves, outside curves, flat fascia areas, and transition points where the geometry changes direction, all within a continuous profile that runs the full width of the cabinet. End grain areas in the molding absorb stain faster and deeper than the surrounding face grain, which will produce obvious dark streaks in the finished molding if the application is not controlled. Working by hand, building the color progressively, and evaluating each area of the molding profile individually before proceeding is what prevents that outcome.
The door frames presented the same end grain challenge at the corners of each frame section. At every point where a stile meets a rail, the end grain of one member is exposed at the joint. These areas absorb color faster than the face grain of the surrounding frame components, and they are exactly at eye level when the door is viewed straight on. Color control at those joints requires a deliberate, staged application rather than a single uniform coat.
For our full approach to color development and furniture refinishing on color change projects with demanding tonal specifications, see our service page.
The Interior: The Decision That Separates This From a Painted Result
The detail that makes this cabinet visually interesting rather than merely dark is the interior.
The interior of all four door sections was deliberately retained in natural cherry finish throughout the project. Looking at the interior detail photograph and through the glazed doors in the finished cabinet photographs, the warm cherry grain reads clearly against the dark slate exterior. The figure visible in the close-up interior photograph, with its characteristic reddish-orange tones and flowing grain pattern, creates a visual warmth inside the cabinet that glows through the glass against the dark frame surrounding it.
This two-tone specification, dark exterior envelope with warm natural interior, is the approach that paint cannot replicate. Paint applied to the exterior of a cherry cabinet in the same dark tone would produce an opaque exterior. But the interior of a painted cabinet is still paint, and paint over cherry flattens the interior into a neutral box without depth or material character. The figure visible through the glazing in the finished photographs is not paint. It is cherry grain under a clear finish that allows the wood to do what cherry does at its best: show warmth, depth, and a figure that shifts in quality depending on the light.
The result of preserving the natural interior is a cabinet that reads differently depending on how you are looking at it. Closed from across a room it presents as a substantial dark piece. Up close with light coming through the glazing, the interior glows with warm cherry figure visible through the slate-colored frames. That quality, which the project brief called a lantern quality, is correct. The interior illuminates the exterior in a way that a painted or uniformly dark cabinet cannot produce.
The Specification Value: Why Designers and Clients Should Consider This Approach
It is worth being direct about the design and economic case for this type of project, because it is relevant for a specific category of client and the reasoning is sound.
A client who wants a dark, glazed statement piece for a room has two options: source new contemporary casework in the desired dark finish, or refinish an existing well-built piece to the specified color. The new casework option provides something in the current finish from the start, but the build quality of available dark-finished glazed cabinets at most price points is significantly below the construction standard of a piece like this cherry cabinet: solid wood case, properly fitted glazed doors, applied crown molding, tight joinery throughout.
Refinishing the existing well-built piece costs a fraction of replacing it with new casework of comparable construction quality. The result is a piece with the specified dark finish, the two-tone interior detail that new casework rarely offers, and the structural quality of the original construction. For interior designers working with clients in Fort Collins, Cherry Creek, Washington Park, or anywhere in the greater Denver metro area who need a dark anchor piece with genuine interior depth, refinishing an existing cherry or walnut case to specification is frequently the stronger decision.
The antique furniture restoration and color change work we do at G. Michaels Restoration serves exactly this kind of design brief. We work with designers, architects, and private clients throughout Northern Colorado and the Denver metro area on refinishing, color matching, and specification-driven color change projects.
Reassembly: Getting the Hardware and Glazing Back Correctly
The reassembly sequence followed the same logic as the disassembly: everything in the right order, the glass last.
With all exterior finish coats applied, cured, and confirmed, the brass retainers and original-style hinge hardware were reinstalled. The detail photograph of the brass glass retainer shows the result: the small oval brass retainer sits flush against the fully finished rabbet without any visible finish ridge or masking residue underneath it. The hinge hardware is reinstalled with the same alignment as before, so door operation and gap consistency are unchanged from the original.
Glazing was reset last, after all hardware was in place and the finish was fully cured. Resetting glass before the finish is fully cured risks adhesion of the glass to the rabbet surface and creates finish transfer issues where the glass contacts uncured material. Resetting glass before hardware is installed can require repositioning that damages the fresh finish at the rabbet edge. The correct sequence is hardware first, glass last, after full cure.
The finished door, visible in the detail photographs, shows what correct sequencing produces: glazing seated correctly in the rabbet, brass retainers flat against the finished wood, hinge hardware properly aligned, and no visible evidence of the masking, ridging, or residue that come from working around fixed glass rather than removing it before surface work begins.
The Finished Cabinet: A Dark Exterior, a Warm Interior, and No Shortcuts Visible
Looking at the finished cabinet from the front, the slate exterior reads as a consistent, even dark tone across the full width of the piece, from the crown molding profile through the door frames and down to the base. The cool blue-gray undertone in the slate is visible in the photographs and more apparent in person under directional light. The natural cherry interior glows through the four glazed door panels with the warmth and figure of the wood clearly visible. The brass hardware is correct against the dark finish without looking precious or mismatched.
This is a straightforward result to describe and a demanding one to produce. The color development, the hand work at the molding profile and door frame corners, the correct sequencing through disassembly and reassembly: all of it contributes to a finished piece where the work is not visible as work. The cabinet reads as if it was always this color, which is the standard a color change project should reach.
Services Included in This Cherry Cabinet Color Change and Refinishing Project
Full disassembly of all four glazed doors: glass removed, hinges, knobs, and catches detached before any surface work
Complete strip of all exterior surfaces to bare wood throughout
Deep slate color developed in stages and applied by hand across case sides, top, crown molding, and all four door frames
Deliberate color control at crown molding profile and door frame end grain junctions throughout
Interior retained in natural cherry finish, untouched
Brass glass retainers and original-style hinge hardware reinstalled after full cure
Glazing reset last, after all finish work confirmed complete
Final inspection under ambient and directional light before delivery
Working With Designers and Private Clients on Color Change Projects in Fort Collins and Denver
If you have a well-built cabinet, case piece, or wood furniture that needs a color change rather than a standard refinish, the project requires a different kind of attention than a simple strip and restain. Color development to a specific tonal specification, control at end grain and molding profile areas, and correct sequencing on glazed pieces are the details that separate a color change that reads correctly from one that reads as a cover-up.
We work with interior designers, architects, and private clients throughout Fort Collins, including Old Town, Midtown, and the south Fort Collins neighborhoods, as well as Loveland, Windsor, Boulder, Denver, Cherry Creek, Washington Park, Arvada, Evergreen, and the greater Denver metro area.
Send photos and your color brief to shop@gmrestores.com or call us at 970-493-8737. Free estimates on all projects.
113 Hickory Street, Fort Collins, Colorado 80524 | (970) 493-8737 | shop@gmrestores.com
Frequently Asked Questions: Cabinet Refinishing and Color Change in Fort Collins
Why does the glass have to be removed before refinishing a glazed cabinet?
Masking around fixed glass during surface work produces a visible finish ridge at the muntin edge once the tape is removed, because the finish builds up against the masking line and leaves a raised edge that is immediately apparent at close range. Masking also traps chemical residue in the rabbet where the glass seats, creating adhesion problems for hardware reinstallation and visible finish contamination through the glass. Removing the glass before surface work begins eliminates all of these issues and allows the door frame and rabbet to be finished correctly all the way through, with the glass reset cleanly against fully cured, properly finished wood.
Can cherry furniture be refinished to a dark color without losing the wood grain character?
Yes, and the two-tone approach used on this cabinet demonstrates why a wood-based dark finish is preferable to paint for this application. The exterior of this cabinet was taken to a deep slate using a stain-based finish system rather than paint, which means the cherry grain remains visible through the dark color at close range and under certain lighting conditions. The exterior reads as near-black from across a room and reveals the cool blue-gray undertone and the wood grain character at closer viewing distances. Paint would have obscured the grain entirely and produced an opaque surface without material depth.
What is the design value of a two-tone cabinet with a dark exterior and natural wood interior?
The two-tone specification, dark exterior with natural wood interior preserved, produces a piece that reads differently depending on viewing distance and light conditions. Closed from across a room it presents as a substantial dark anchor piece. Through the glazing, the warm natural interior creates a visual warmth that paint over the interior cannot replicate. For clients who want a dark statement piece without losing the warmth and depth of real wood, and for designers who need an existing well-built piece specified to a new color rather than replaced with lower-quality new casework, this approach provides the correct result at a fraction of the replacement cost.
Do you do cabinet color change refinishing near Denver?
Yes. We serve clients throughout the greater Denver metro area from our Fort Collins shop, including Denver, Boulder, Cherry Creek, Washington Park, Arvada, Evergreen, Loveland, Windsor, and surrounding communities. We work with designers, architects, and private clients on specification-driven color change and refinishing projects. Free estimates are available on all projects. Send photos and your color brief to shop@gmrestores.com or call 970-493-8737.
Located in the historic city of Fort Collins, Colorado, G. Michaels Restoration is an experienced furniture repair and antique furniture restoration shop serving Fort Collins, Loveland, Windsor, Boulder, Denver, Cherry Creek, Arvada, Evergreen, and the greater Denver metro area since 1985.
113 Hickory Street, Fort Collins, Colorado 80524 | (970) 493-8737 | shop@gmrestores.com
Located in the historic city of Fort Collins, Colorado. G. Michael’s is an esteemed furniture repair and antique furniture restoration wood shop.